Showing posts with label Process. Show all posts

Magic The Gathering Tokens

My original goal was to turn my mushroom pictures into counters for Magic the Gathering. Turns out, they were not ideal for these small circle chits. I had the feeling that would happen, but that's okay. Instead, I recreated each of the mushrooms individually and now I can make them into stickers and, as I originally intended, counters for Magic!

Here are the mushrooms drawn individually.


Afterward, I scanned them, made a background, and scaled them to fit on my label template. 


I printed them (after fiddling for far too long with printer settings) and stuck them to the cardboard chits I had ordered. It was a little time consuming, but I also coloured the edges of each of the chits to hide the grey cardboard edge. I'm happy with how they turned out and can't wait to use them in a game!

Eventually, I think I'll turn these individual mushroom images into a sticker sheet. That's a whole other thing to learn how to do, but I'm excited for that. For now, it may be time to move onto something new with a lack of mushrooms.

Mushroom Spores Part 2

 Here are the final mushroom spore pictures! I've had a lot of fun doing these, and when I've managed to finish the tokens I will share. Trying to do a variety of different mushrooms and locations and incorporate the spores each time.


Here's the rough outline work for these.


That's all the images I was planning to do. Now I'll see about getting them onto little tokens for Magic the Gathering! If they don't work out... well, I guess I'll make some simple smaller images. I'm still happy with these even if they don't end up getting used the way I originally intended.


Mushroom Spores Part 1

This all starts with a magic the gathering deck - Xavier Sal the Infested Captain. Back in the day I had a different Saproling commander deck that I really enjoyed. For those who don't know what a Saproling is, it is a sort of fungus plant creature in the magic the gathering card game universe. Usually depicted like the image below.

Your typical Saproling creature.

Now, with Xavier Sal I have breathed new life into a Saproling deck once again! Where is this all going? Well, fungus creatures, which make Saprolings, need spore counters. Counters which are usually tracked with a simple dice. However, I want to step it up a notch so I'm going to make my own spore counters with mushrooms and spores on them! It's inspired me to make some small 4x4 images. Here they are!


I'm continuing my journey into the world of colouring with markers - I like how they are turning out. They're made with Copic, Ohuhu markers, and Copic multiliners for the outlines. My plan is to put a portion of the image onto a small chit token. I'll print on circle stickers then I can apply them to the chits.


Here's the rough sketch work for each of the images.


I'm planning to do another set of 4 mushroom spore images so that I'll have a large variety of tokens, but I'm also just having a lot of fun making these. Thanks for stopping by!

Whistling Forest - Process

 I've wanted to make a piece of fanart for a streamer I like for a while now. Life gets pretty busy being a father of two so time is precious. Some of that precious time finally got spent on the following piece! The streamer's channel is called Whistling Forest. I know I wanted a forest scene and to possibly incorporate some kind of whistling - just like the name of the channel. Makes sense right? I decided to have the streamer playing video games at dusk in the forest. The trees are making little whistling music notes as they watch and a few little mushroom dudes have also come to watch the exciting game.


Like everything we first start out with a really rough sketch to get the idea into the real world. Get out of my head! Again, I knew I wanted a forest scene with the streamer playing some video games.


I plugged one of those rough sketches into Krita and used it as a base. From there I created some perspective lines and roughed in the general tree locations, leaves, bushes, and the streamer. Once that was taken care of I also added some details like the water bottle, mushroom viewers, tree stump, and computer.


I tried drawing out the title, Whistling Forest, but it didn't look very good. A standard font didn't seem to fit as well so I decided to make the very tedious and time consuming decision to custom design the lettering in Inkscape. That's a program I hadn't used in a long time sooo... I kind of had to relearn it a little bit. That didn't help me finish it any faster, but I was happy with the result. I wanted something with square cornered bottoms and rounded tops.


Reference is key - and drawing some sitting cross legged is a little more challenging that I anticipated. I had to go back and redraw his legs a few times. I was initially inspired by the art piece below title "Journey" by Varguy for the style of my piece. Their colours and linework really appealed to me so I tried to emulate it - I didn't nail it, but it turned out alright.


A forest at dusk.

Journey by Varguy inspired me.

Really happy with the way this turned out and the streamer really liked it as well! Thanks for checking out my process. If anyone ever has any questions for me about my process I'm more than happy to answer as best as I can.


Updating the Brand - Shop Vorgus

I always liked the original picture I had used for my Zazzle shop, Shop Vorgus, but it's pretty old at this point and was just quickly and poorly cropped to fit in place as a banner and profile image. The shop has been getting a refresh and I decided it was time to refresh the branding as well. New banners, new logo, new products and on and on.

Below is the original logo artwork. I liked the colours and the theme, but this picture was originally just me experimenting in photoshop with brushes and settings. It doesn't properly fit the dimensions of anything so it was always cropped oddly when I used it.

The original Shop Vorgus artwork.

Like most things I began to sketch out some designs. I wanted something similar to the original, but simple, and useable on the interwebs. You can see the designs I settled on circle below.
Tried making it a little cutesy, but also mysterious in a way.

Here's the final artwork! I like the ocean ripples and I think I captured a cute but mysterious look by making it small with short little tentacles and leaving the eyes as two simple white dots.

This can be used as a profile picture

This is the main banner image, which can easily be adjusted to fit various dimensions.

Thanks for checking it out! If you'd like to see what sort of things I'm selling follow this link to Shop Vorgus on Zazzle. Below are some of the collections of various designs and products I have listed there. Check them out if there's anything that catches your eye, thanks!


Hypnotic Octopus over Shipwrecks - Process

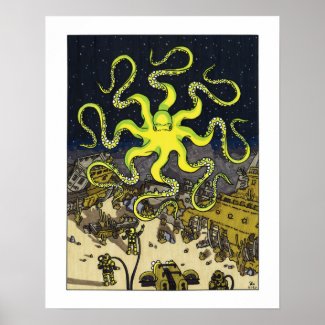
Here is the final piece I'm making in this series of hypnotic octopuses. I've been trying to make them all very different while maintaining the central theme of the spiral like octopus in the middle. This time there are no fish around, but instead there are a few divers and their submersible lighting up the ocean floor. The large octopus is close, and so is the graveyard of ships that stretch out behind it. I went through pretty much the same process to create this one, but it's cool to share the steps from nothing to something.

It all starts with the idea. I've already had the idea for the hypnotic octopus, but I still needed to create the rest of the piece as well! I decided to go with shipwrecks because I though it would fit the them and look cool.


Here are some of the main references I used for this piece. All were important because I really didn't know how the diving suit would look, or a submersible, or a shipwreck! I had a feeling of what a shipwreck would look like, but I never would have got the shapes and details right without the reference.


Layout sketch always gets a few passes before it is turned into some nicer linework for me to work with.


Colours, the bane of my existence. I knew I wanted the background dark and the graveyard of ships to recede into the darkness. Also, I knew the submersible was going to be casting a bright light on the ships and divers closest. My wife helped me refine the colour choice to what ended up in the final piece.


Finally, here is the result of all that work!
I managed to this finish this piece fastest of all which surprised me because of how complex it is. There were numerous passes with different copic markers to get the colours I wanted as well. I think that just shows how the more you do something the better and faster you can get at it. I'm really happy with the way this one turned out. On to a new piece - I've got some ideas ;) Thanks for looking!

If you're interested in a poster print of this piece check out the link below, thanks!